Snap parts together with sockets
A socket is a named point on a part where another part belongs: the doorway in a wall, the window opening, the top of a storey. This guide builds a two-storey house front from six separate GLBs in the London terraced houses pack, placing each one on a socket rather than typing in coordinates. The code below is the code we ran to make the picture.
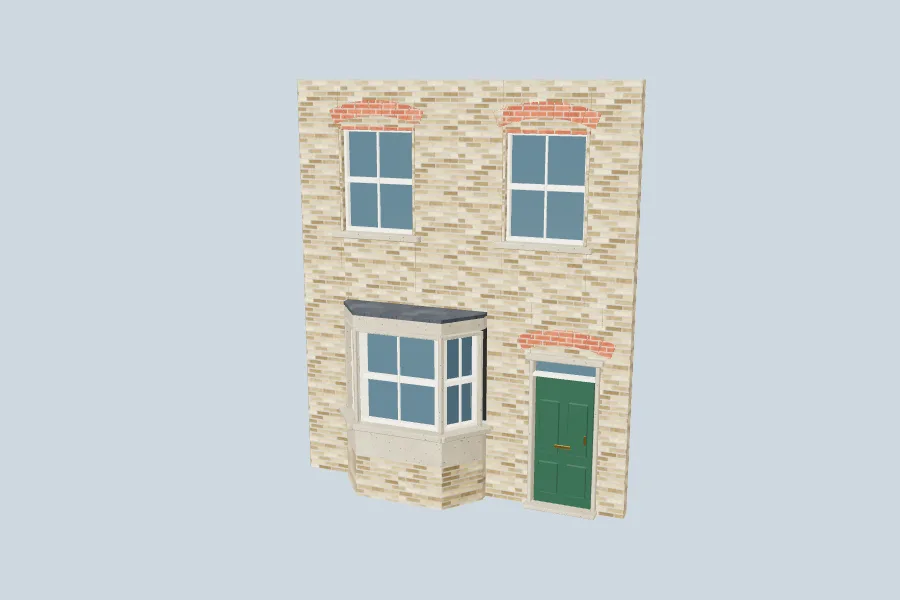
Where the sockets are
They are in the pack's manifests/catalogue-v2.json, on each model's entry, not inside the GLB. Each one has an id, a position in metres in the part's own space, and the kinds of part it accepts. The Ground-floor front wall with bay opening (right hand) wall has four:
"sockets": [
  { "id": "stack-bottom", "position": [0, 0, 0],      "accepts": ["london-residential"] },
  { "id": "stack-top",    "position": [0, 3, 0],      "accepts": ["london-residential"] },
  { "id": "door-front",   "position": [1.6, 0, 0],    "accepts": ["door"] },
  { "id": "window-front", "position": [-0.65, 0.65, 0], "accepts": ["window"] }
]
The upper wall has window-0 and window-1 at ±1.25 m, 0.8 m up, and the roof has mount-chimney. (The pack's catalogue.json lists socket names only; the positions are in the manifest.)
The code
Unzip the pack next to your script. It loads the GLBs directly with three.js, so it needs the meshopt decoder (see fixing meshopt errors).
// Tutorial example: build a house front by snapping parts onto named sockets.
// Assumes the pack is unzipped next to this file (models/, manifests/catalogue-v2.json).
import { GLTFLoader } from 'three/addons/loaders/GLTFLoader.js';
import { MeshoptDecoder } from 'three/addons/libs/meshopt_decoder.module.js';

const loader = new GLTFLoader().setMeshoptDecoder(MeshoptDecoder);
const catalogue = (await (await fetch('manifests/catalogue-v2.json')).json()).assets;
const entry = (id) => { const v = catalogue[id]; return v[Math.max(...Object.keys(v).map(Number))]; };

// Load one part. Remember which model it is so we can look up its sockets.
export async function part(id, level = 'medium') {
  const { scene } = await loader.loadAsync(`models/${id}/${level}-${id}.glb`);
  scene.userData.part = id;
  return scene;
}

// A socket is a named point in the part's own space (metres): put the child there.
export function attach(parent, socketId, child) {
  const socket = entry(parent.userData.part).sockets.find((s) => s.id === socketId);
  if (!socket) throw new Error(`${parent.userData.part} has no socket ${socketId}`);
  child.position.fromArray(socket.position);
  parent.add(child);
  return child;
}

export async function houseFront(level = 'medium') {
  const ground = await part('london-residential-front-bay-right', level);
  attach(ground, 'door-front', await part('london-residential-door', level));
  attach(ground, 'window-front', await part('london-residential-bay', level));
  const upper = attach(ground, 'stack-top', await part('london-residential-upper-wall', level));
  attach(upper, 'window-0', await part('london-residential-sash', level));
  attach(upper, 'window-1', await part('london-residential-sash', level));
  return ground; // move or rotate this one object and everything snapped to it follows
}
Add it with scene.add(await houseFront()). The parts land exactly where the pack's own assembled house puts them: door at (1.6, 0, 0), bay at (−0.65, 0.65, 0), upper wall at 3 m and the sashes at (±1.25, 3.8, 0). We checked each world position against the assembly file.
Why attach rather than position
- Everything follows its parent. Each part is added as a child of the part it sits on, so moving or turning the ground-floor wall carries the door, windows and upper floors with it.
- Swapping is one line. A socket says what kind of part it takes (
accepts), so changing which model goes onwindow-0ordoor-frontis a different id in oneattachcall, with no coordinates to work out. - Storeys stack.
stack-topon one wall is where the next wall'sstack-bottomgoes, 3 m up, so a three-storey front is one moreattach.
Sockets carry a position but no rotation in this pack: parts share the kit's frame (front facing +Z, up +Y), so a door needs no turning to fit its wall. Loading GLBs this way gives you their own PBR materials; for colourways and weathering, use the pack's assemblies and the kit runtime (colourways guide).